SmartCover BT – Quick Start Guide
Congratulations on the purchase of your SmartCover BT.
This quick-start guide is designed to help you set up the SmartCover system quickly and correctly. It explains how to connect the pressure sensor and highlights important points to ensure accurate and reliable measurements.
1. Product Description
The Velometrik SmartCover BT is an advanced, wireless saddle pressure measurement system designed for professional bike fitters. It enables high-resolution, real-time pressure mapping of the cyclist’s contact area with the saddle using 348 independent textile pressure sensors, providing detailed insights into pressure distribution, asymmetries, and peak pressures.
This data supports ergonomic saddle fitting, enhances comfort, and helps optimize performance.
The system operates wirelessly via Bluetooth, with all analysis performed in a web browser — no extra software installation required. Its rugged, medical-grade cover material is waterproof, disinfectable, and certified for skin contact, making it suitable for commercial use.
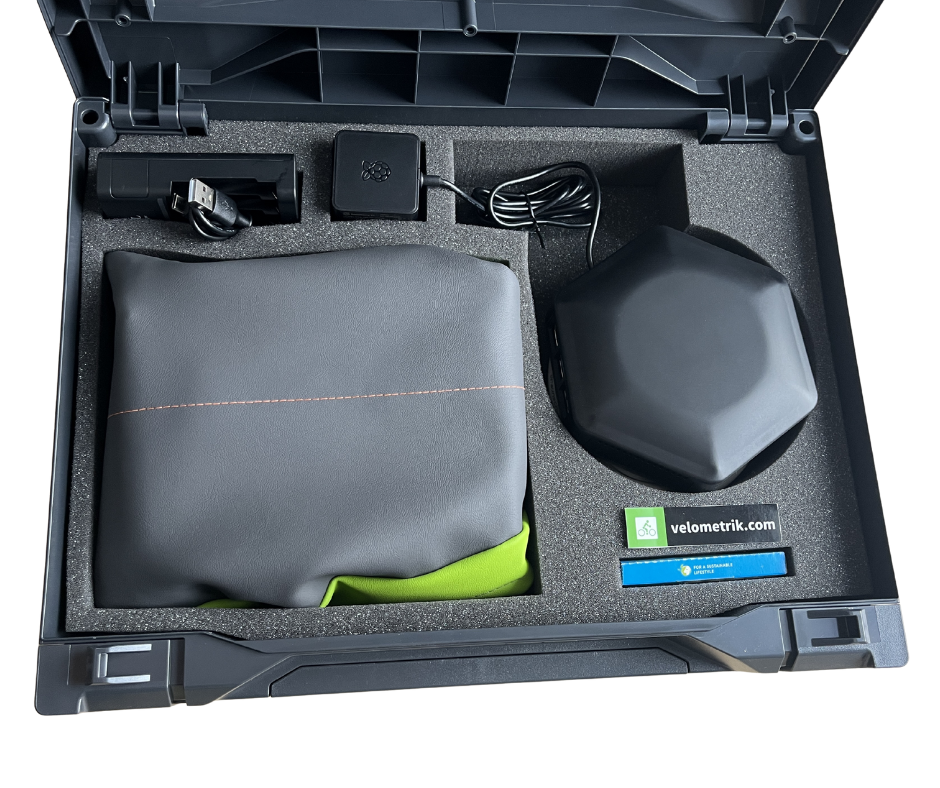
Img. 1: Box Content
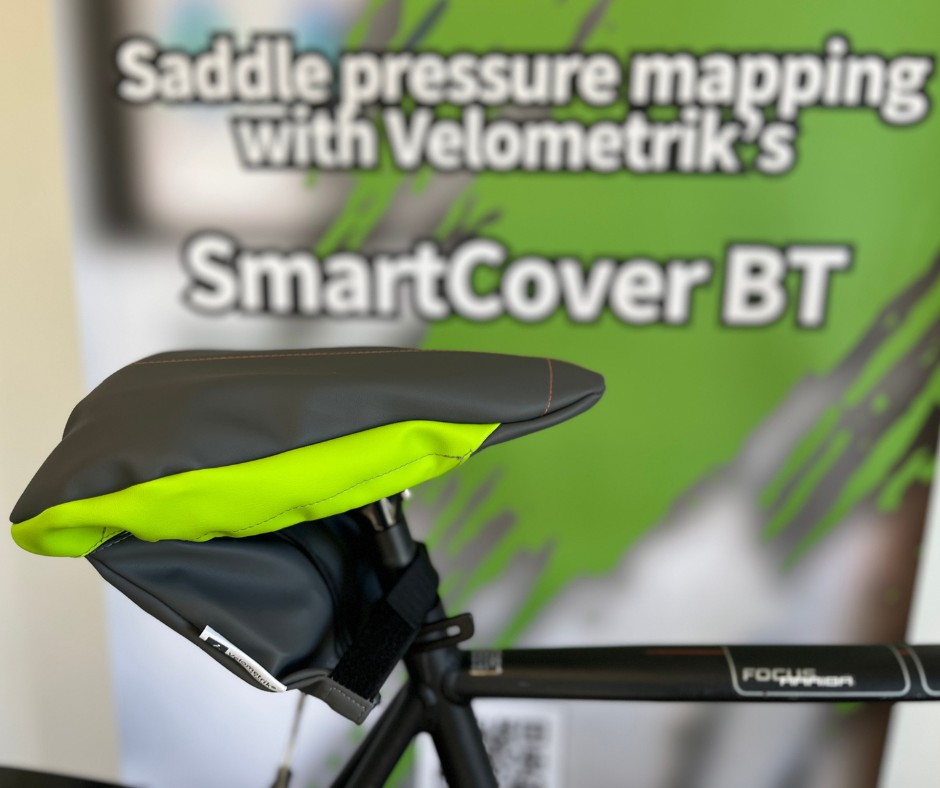
Img. 2: SmartCover
Important: Before using your SmartCover BT for the first time, please follow the steps in this Quick Start Guide.
2. What’s Included
Your SmartCover BT package should contain:
- SmartCover pressure sensor mat
- Velocontrol unit (Bluetooth transmitter/controller)
- Velobox (core processing unit with web interface) with Power adapter (EU, US, or UK)
- USB cable
- Network (Ethernet) cable
- Wi-Fi antenna
- Battery charger
- 8 × AAA rechargeable batteries
- Transport case
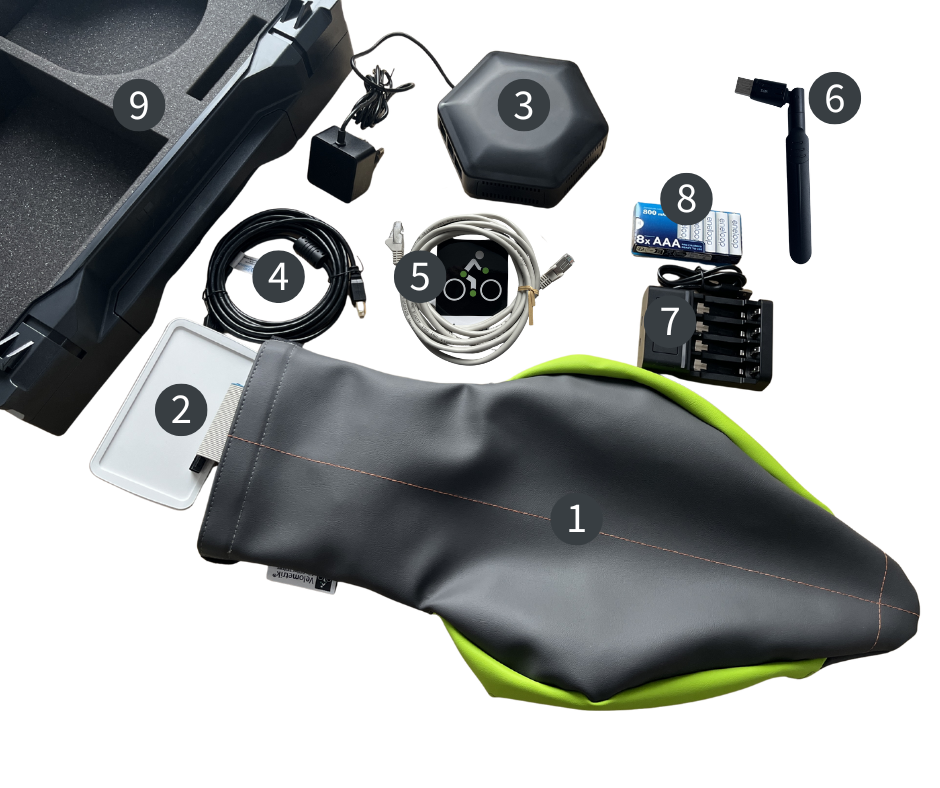
Img. 3: SmartCover Set
Note: Packaging may vary slightly by region or special orders.
3. Quick Start
Step 1: Preparing the Velocontrol and SmartCover
- Place the SmartCover on a clean, flat surface.
- Open the fastening flap on the rear side of the SmartCover.
- Carefully remove the Velocontrol unit from the integrated pocket.
- Insert the rechargeable batteries into the Velocontrol.
(Batteries are approx. 70% precharged and ready to use.) - Switch on the Velocontrol by briefly pressing the power button.
-
Wait until the status LED lights up solid blue.
A solid blue LED indicates that the Velocontrol is ready for use and can connect to the analysis software.
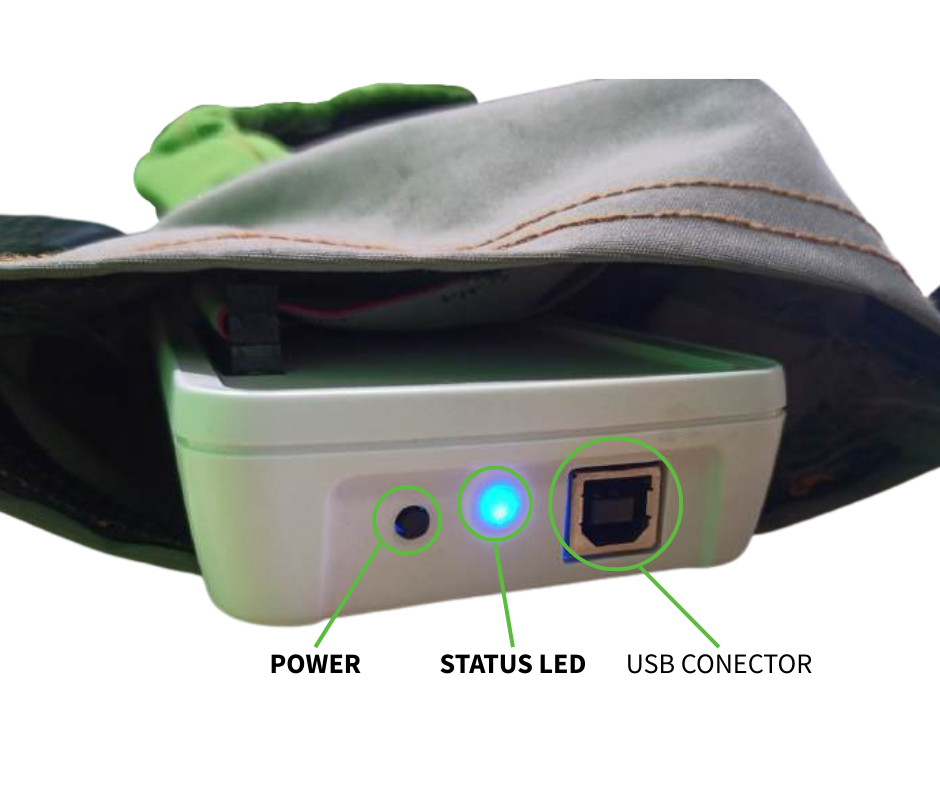
Img. 4: Velocontrol
-
Place the Velocontrol back into the SmartCover pocket and securely close the fastening flap.
- Position the SmartCover centrally on the bicycle saddle, ensuring it lies flat and conforms to the saddle shape.
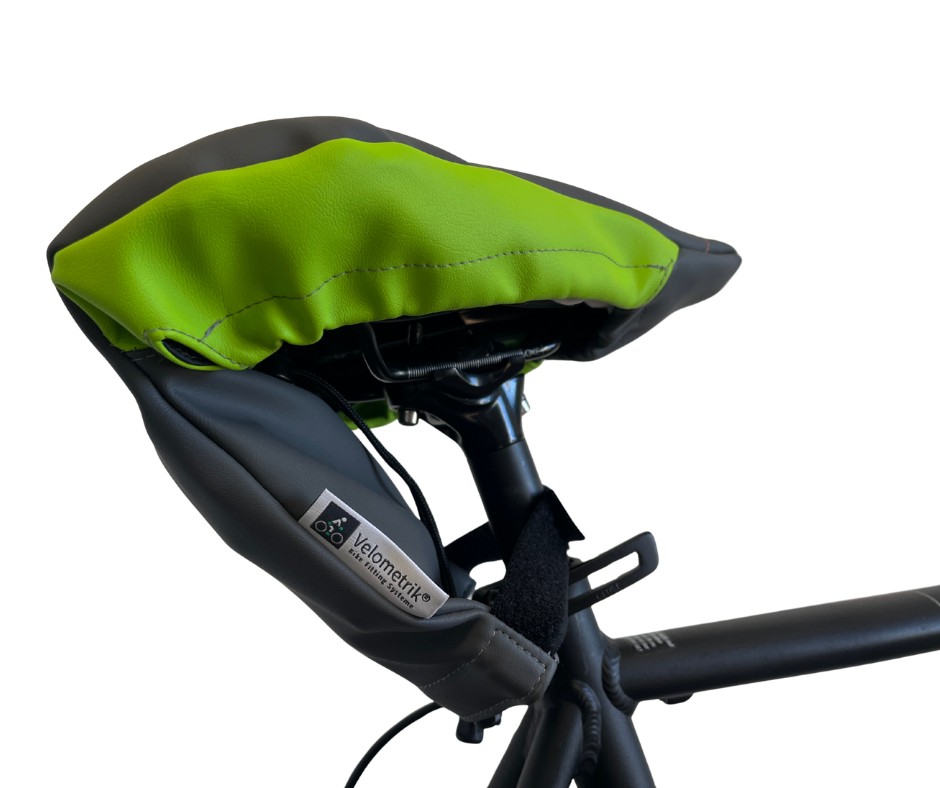
Img. 5: SmartCover in position
Important Notes about the bluetooth connection
- If the status LED flashes blue continuously before the analysis software is started, remove the batteries and insert them again.
- A flashing blue LED indicates an active Bluetooth connection that must be disconnected.
- The Velocontrol connects automatically to the Velometrik analysis software and does not need to be paired via Windows, macOS, iOS, or Android.
Important Notes about the Bluetooth Connection
- The Velocontrol connects automatically to the Velobox via Bluetooth. No manual pairing is required.
- Do not attempt to pair the Velocontrol directly with your PC, laptop, or tablet.
- If the Velocontrol connects to another device, it cannot connect to the Velobox.
- If this happens, remove the batteries briefly and reinsert them to restart the Velocontrol.
- Alternatively, the Velocontrol can be connected to the Velobox using the supplied USB cable.
This wired method is intended for testing only and is not recommended for regular bike-fitting sessions.
Step 2: Connecting the Velobox
The Velobox supports three connection methods. Choose the option that best fits your environment.
Recommendation:
Whenever possible, use a wired LAN connection for maximum stability—especially during first-time setup.
Option 1: Direct Connection to a Computer (LAN)
(Windows 10+, macOS Ventura+)
- Connect a LAN cable directly from the Velobox to your PC or laptop.
-
Connect the Velobox to a power outlet.
Both devices automatically assign local IP addresses via DHCP.
-
Open a web browser and enter:
  http://velobox[SERIAL].local
 (Example: http://velobox448.local)
IMPORTANT: Make sure the address starts with http:// and does not include the letter “s” (https://). Using https:// may prevent the page from loading correctly.
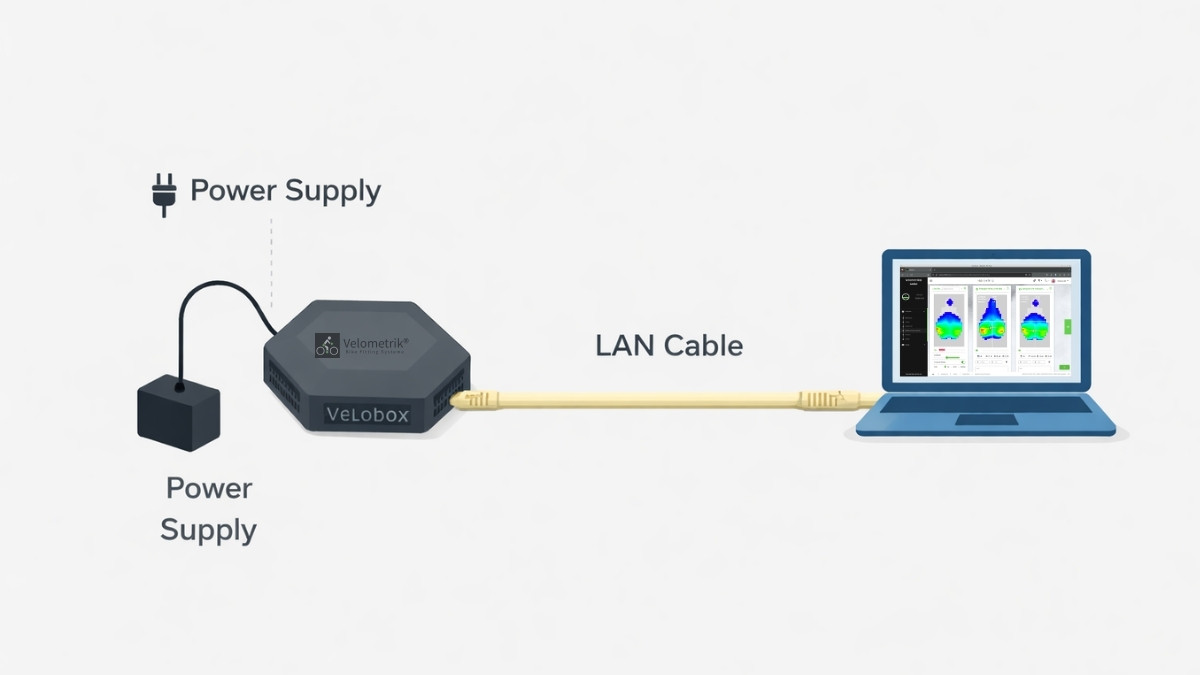
Img. 6: Velobox connected directly to the computer using a LAN cable
IMPORTANT: With this option, the Velobox will not be connected to the Internet, so it will not be possible to perform updates in the future.
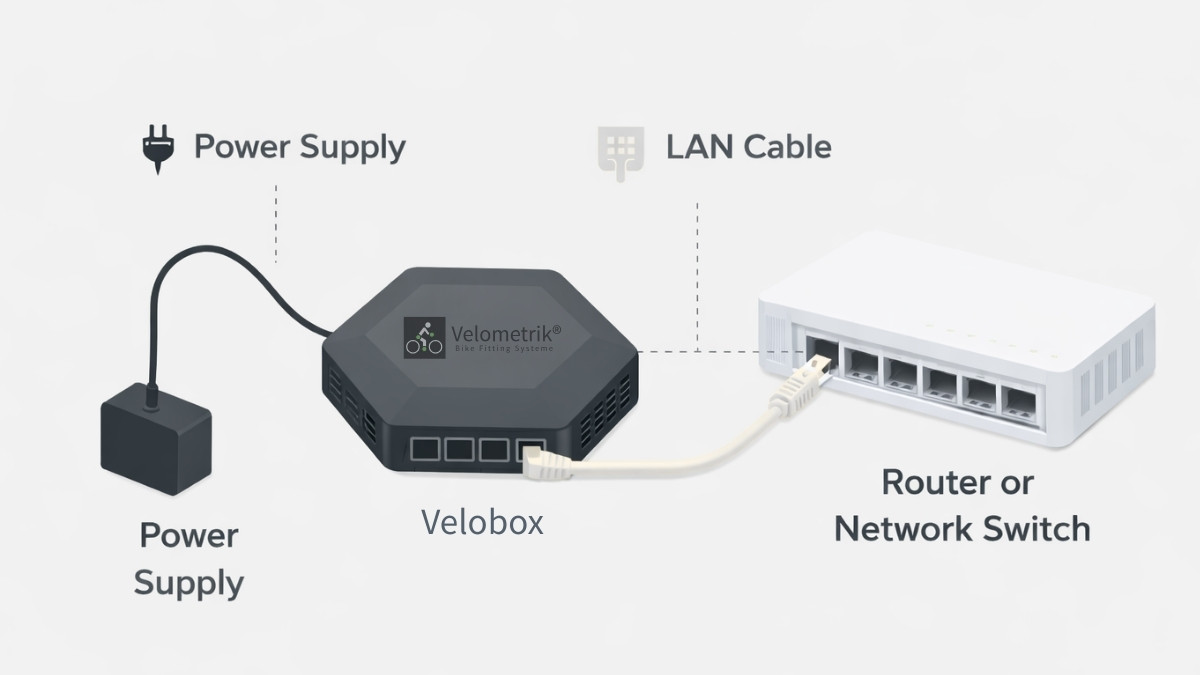
Option 2: Wired Network Connection (LAN)
- Connect a LAN cable to the Velobox.
- Connect the other end to your router or network switch.
-
Connect the Velobox to a power outlet.
The Velobox automatically receives a local IP address via DHCP.
-
Open a web browser and enter:
  http://velobox[SERIAL].local
 (Example: http://velobox448.local)
IMPORTANT: Make sure the address starts with http:// and does not include the letter “s” (https://). Using https:// may prevent the page from loading correctly.
Img. 7: Velobox Connection with LAN cable
Environment and Network Considerations
- DHCP must be enabled on the local network for automatic IP assignment.
- Firewall or security software may restrict access in managed corporate networks.
- For maximum stability and minimum latency, wired LAN connections are strongly recommended in professional studios.
Step 3: Accessing the Analysis Software and Starting a Measurement Session
3.1 Accessing the Velobox
The Velobox is operated via a standard web browser. No software installation is required.
-
Open a web browser on your device.
Google Chrome is recommended for optimal performance. Other modern browsers (Firefox, Edge, Safari) are supported; however, some features or graphical elements may be limited depending on the browser. -
Enter the following URL in the address bar:
http://velobox[SERIAL].local
(Example: http://velobox710.local) (Img.9)
IMPORTANT: Make sure the address starts with http:// and does not include the letter “s” (https://). Using https:// may prevent the page from loading correctly.
-
The Velobox dashboard is displayed. (Img. 9)
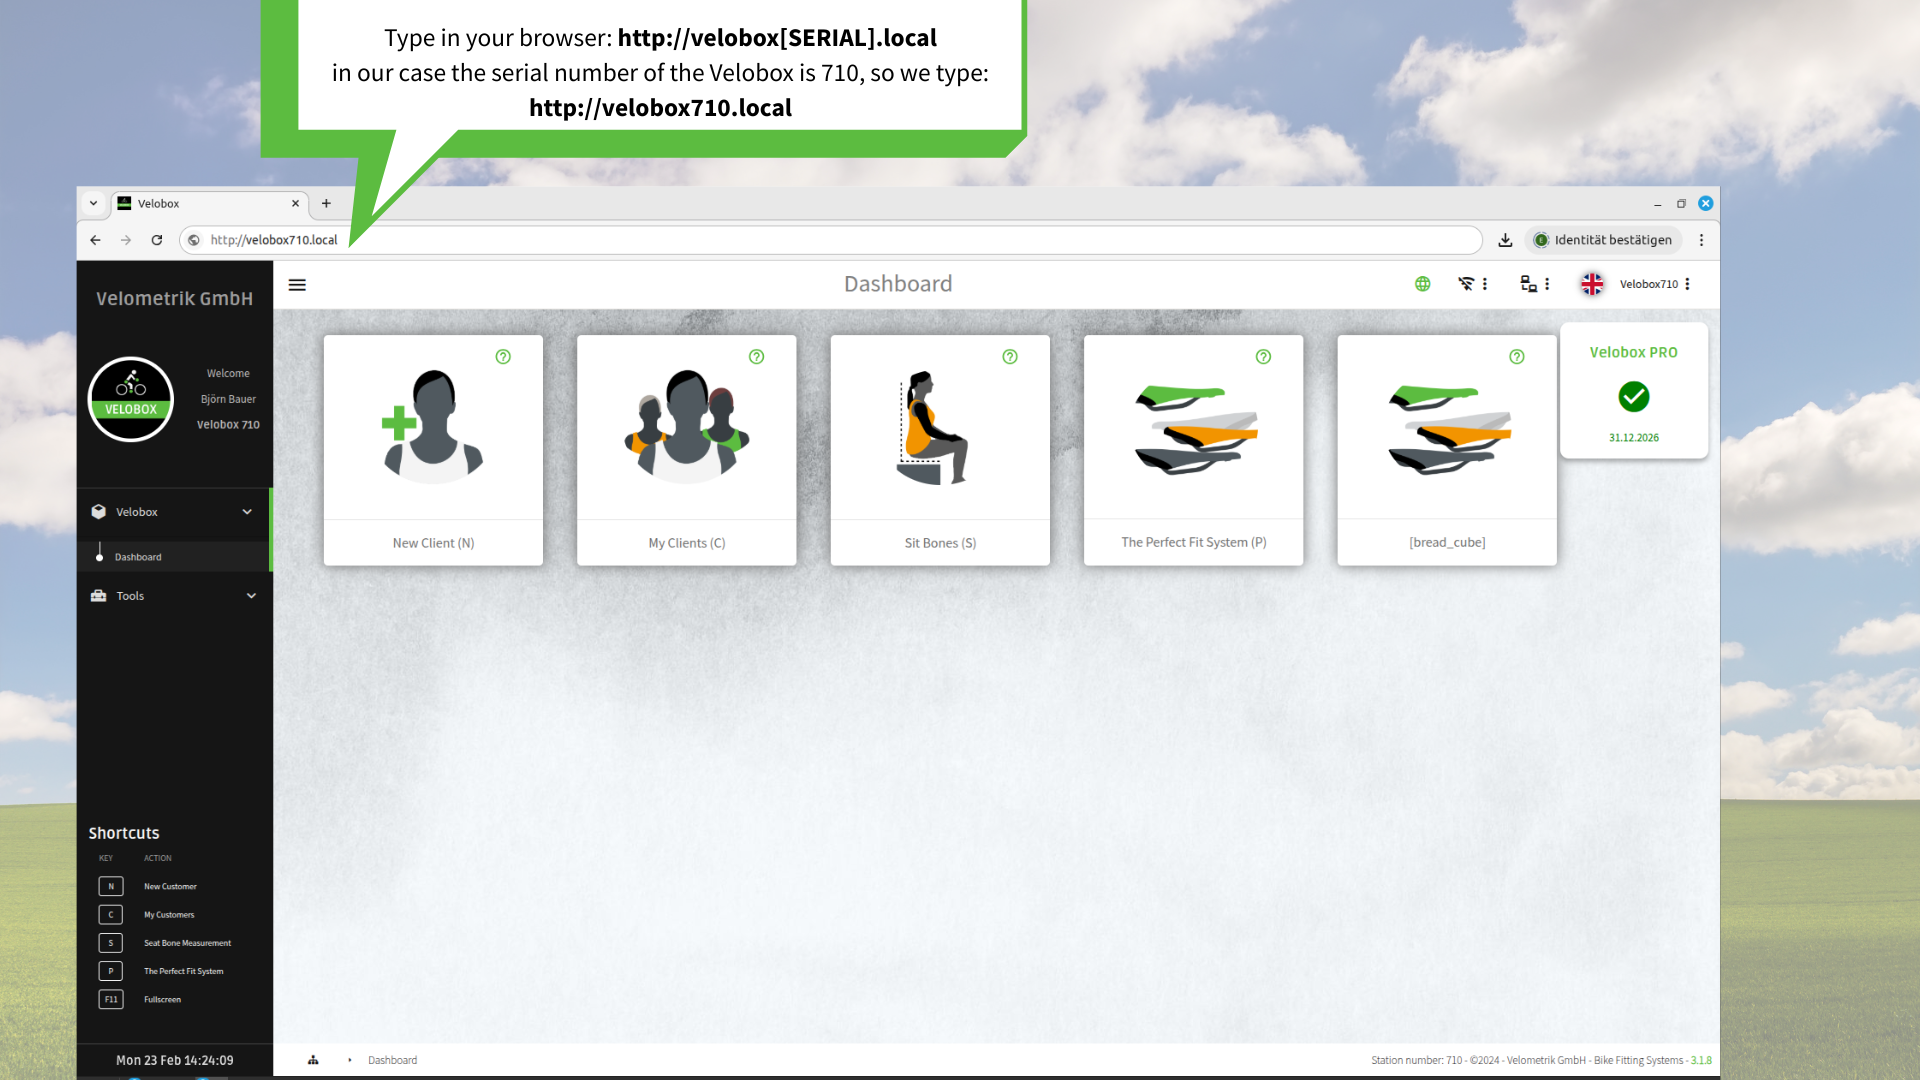
Img. 8: Velometrik software Dashboard.
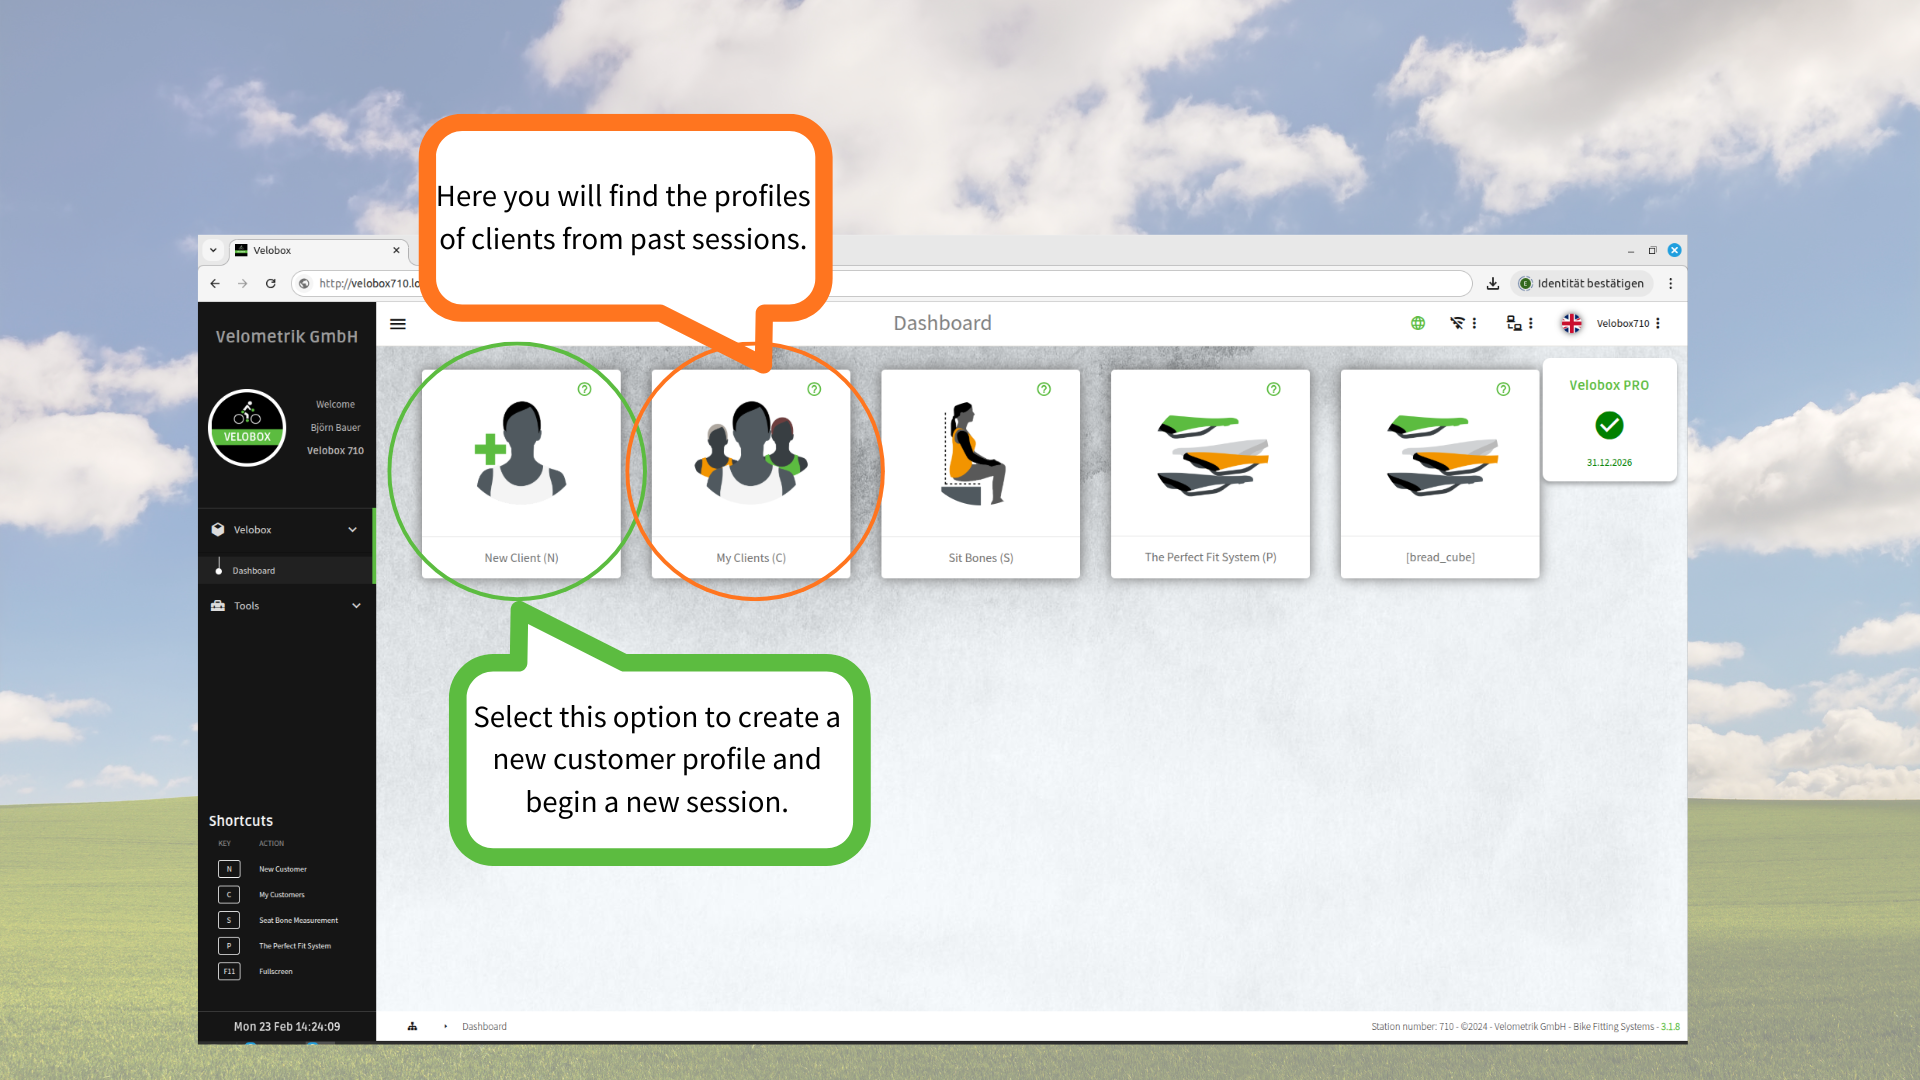
3.2 Creating or Continuing a Bike Fitting Session
- On the dashboard, select the appropriate starter.
- Select an existing customer or create a new customer profile.
- Start a new Bike Fitting session.
Img. 9: Velometrik software Dashboard.
3.3 Saddle Pressure Analysis with SmartCover
-
Create a new customer profile (Img. 11) and click SAVE, after this you will be redirected to your clients list.
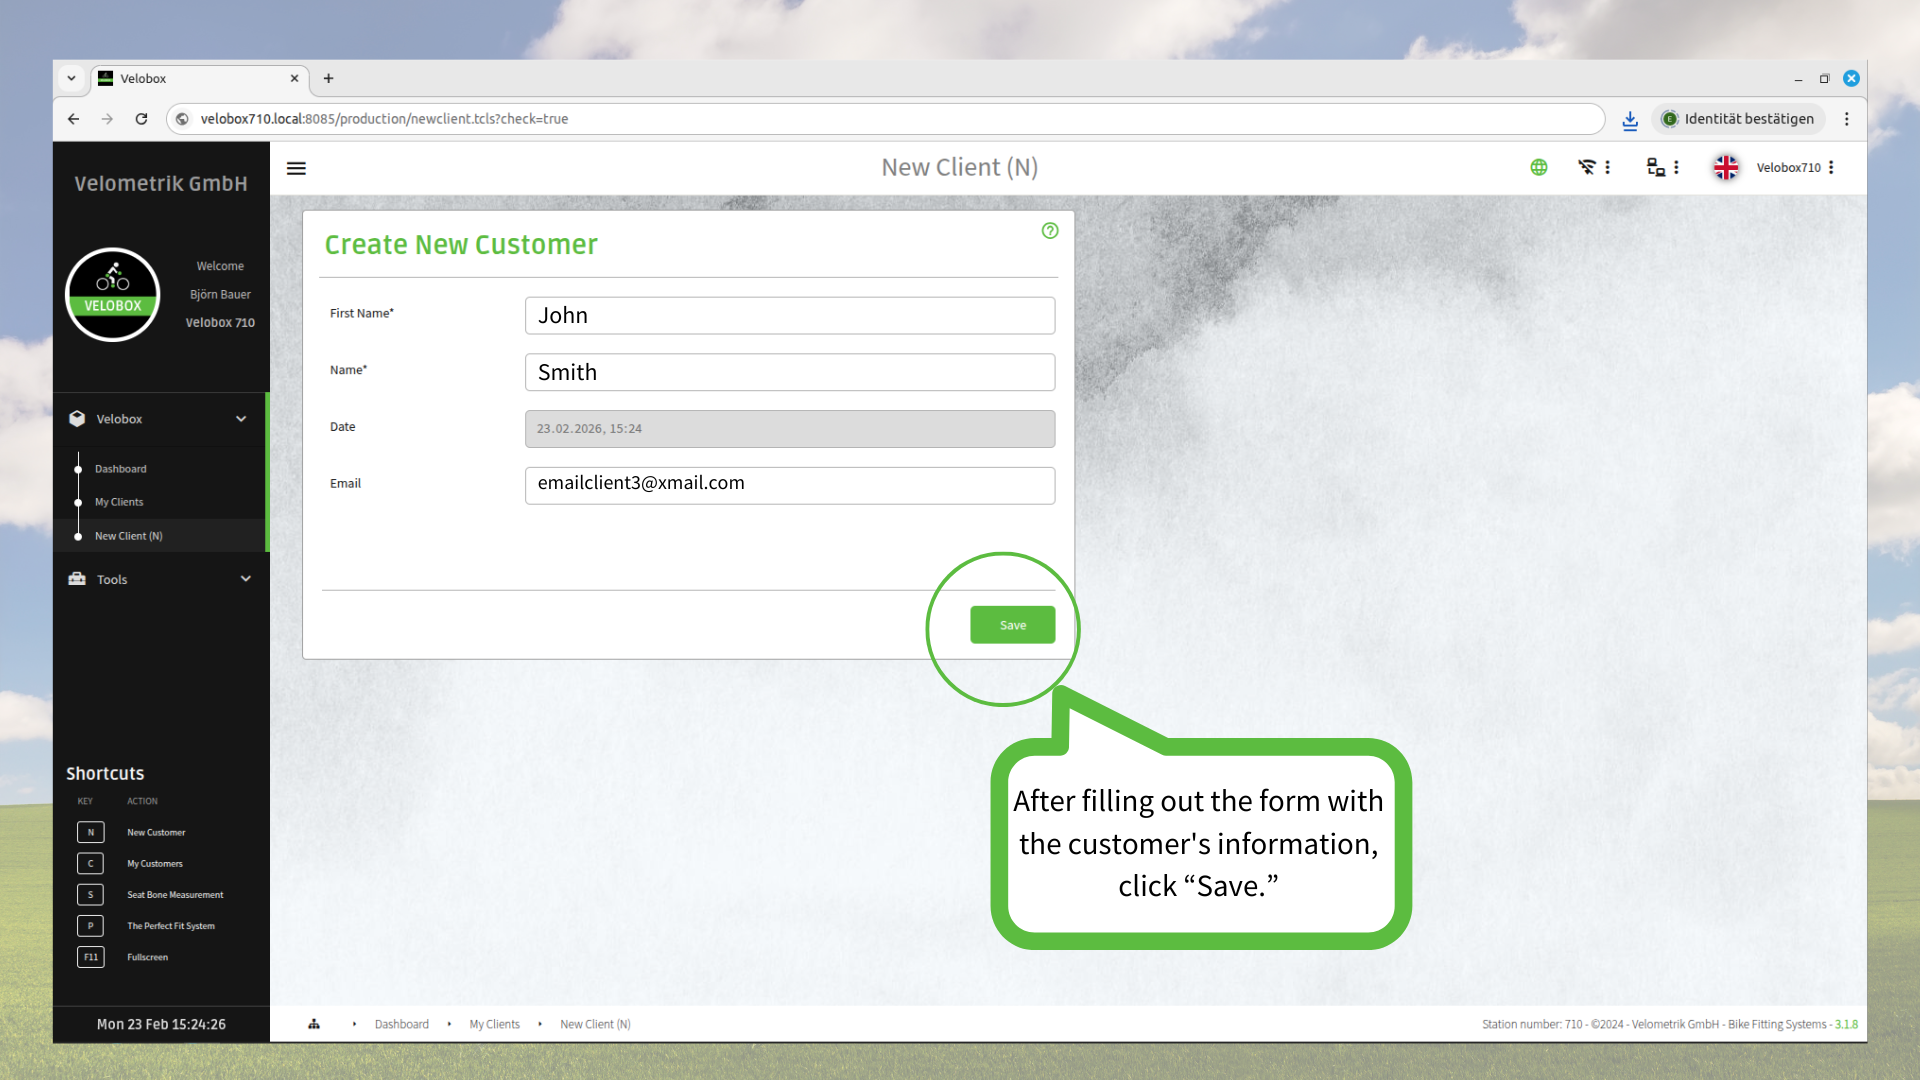
Img. 10: New profile creation
2. Click on the name of the new customer (Img.12).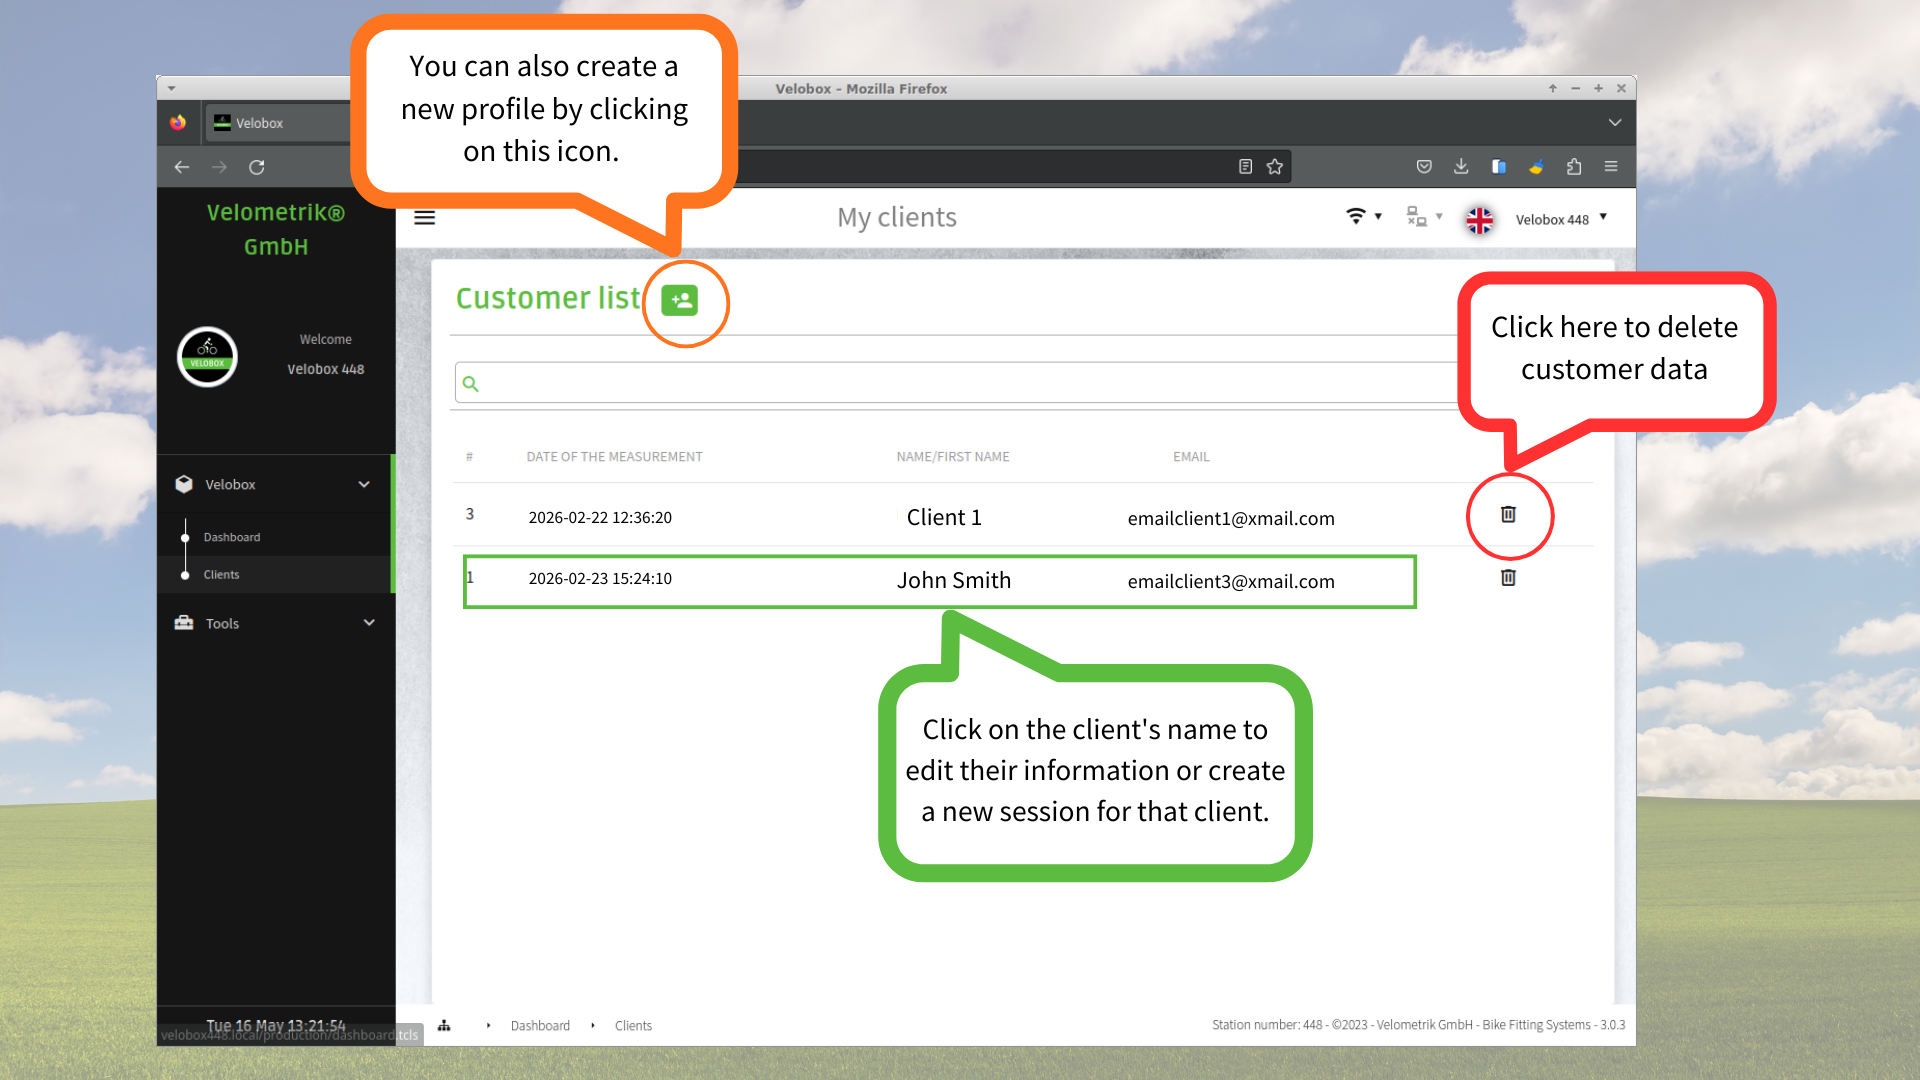
Img. 11: Customer List.
3. Click on the icon to start a new session.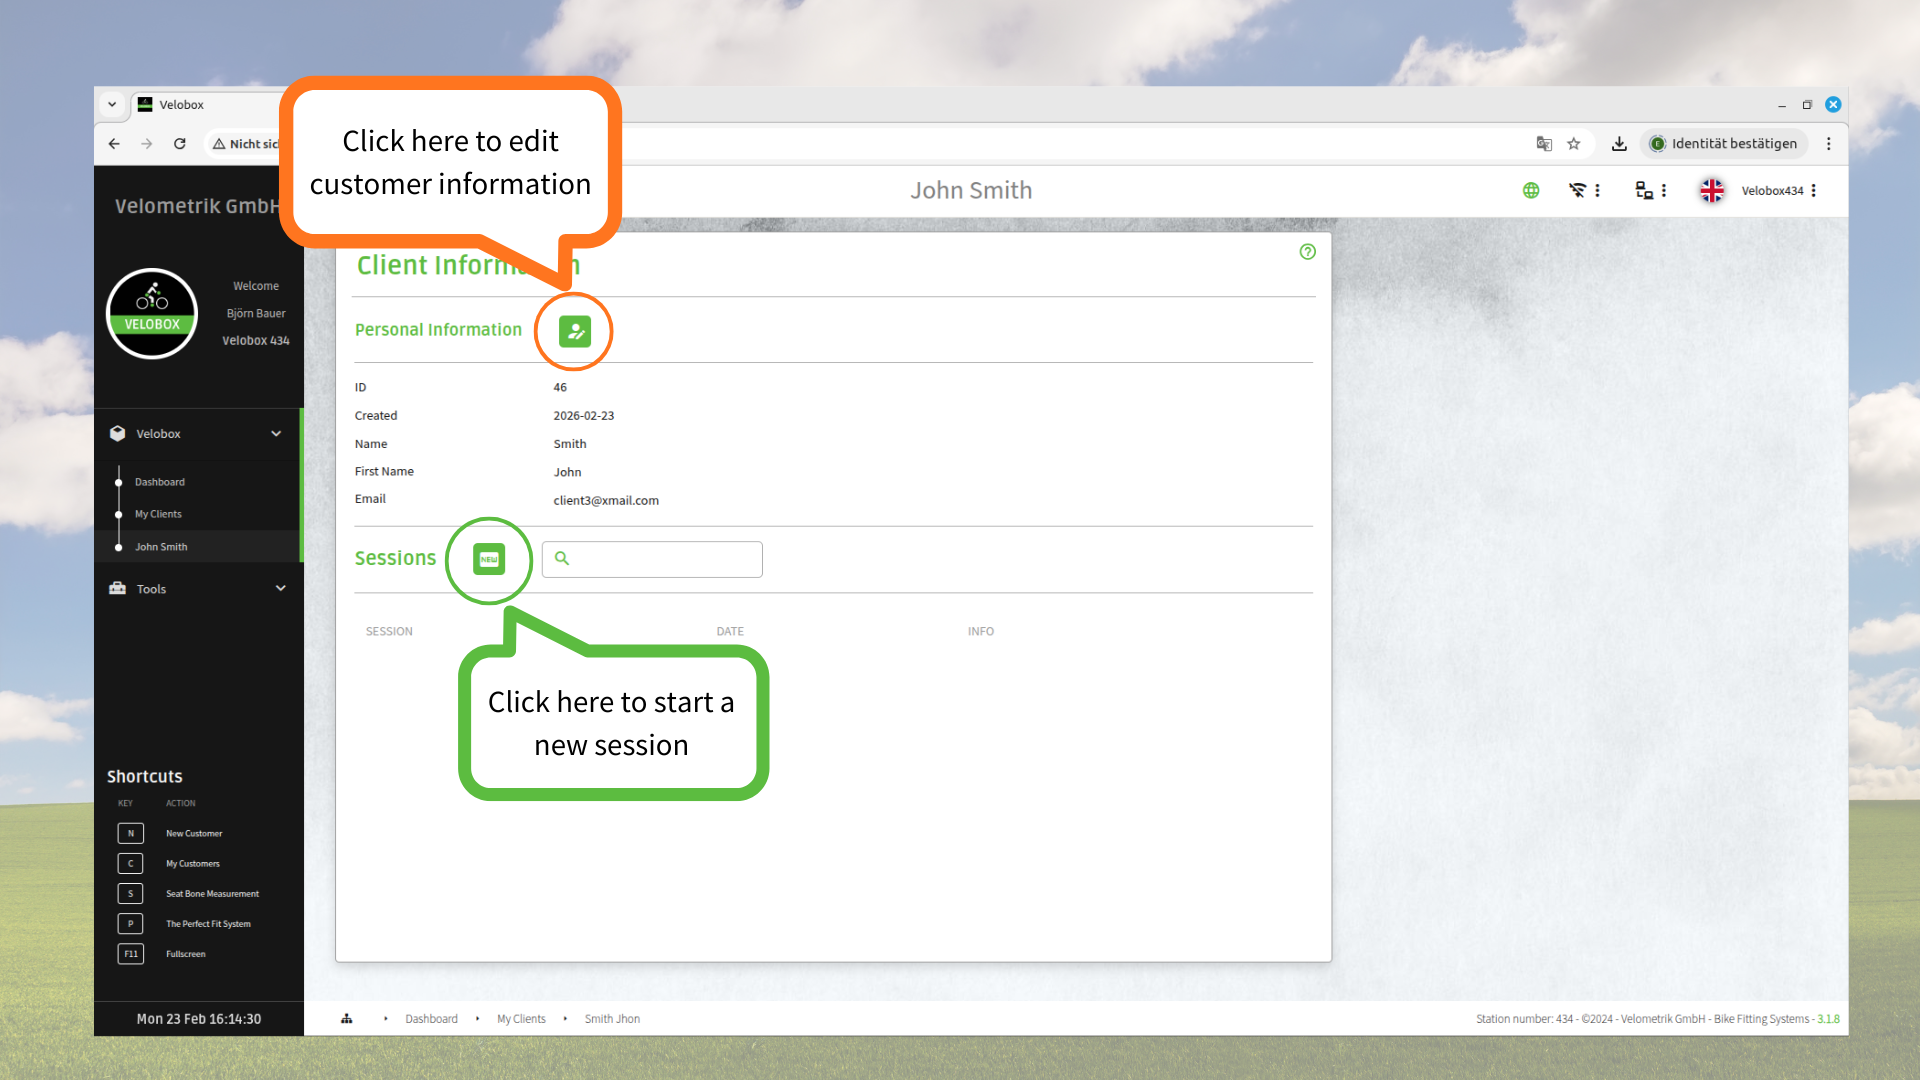
Img. 12: Client Profile.
4. When you create a new session, you will be directed to the screen for creating the client’s medical history (“Anamnesis”). Here, you can enter any relevant information obtained from the client. The fields can be edited in the Settings section.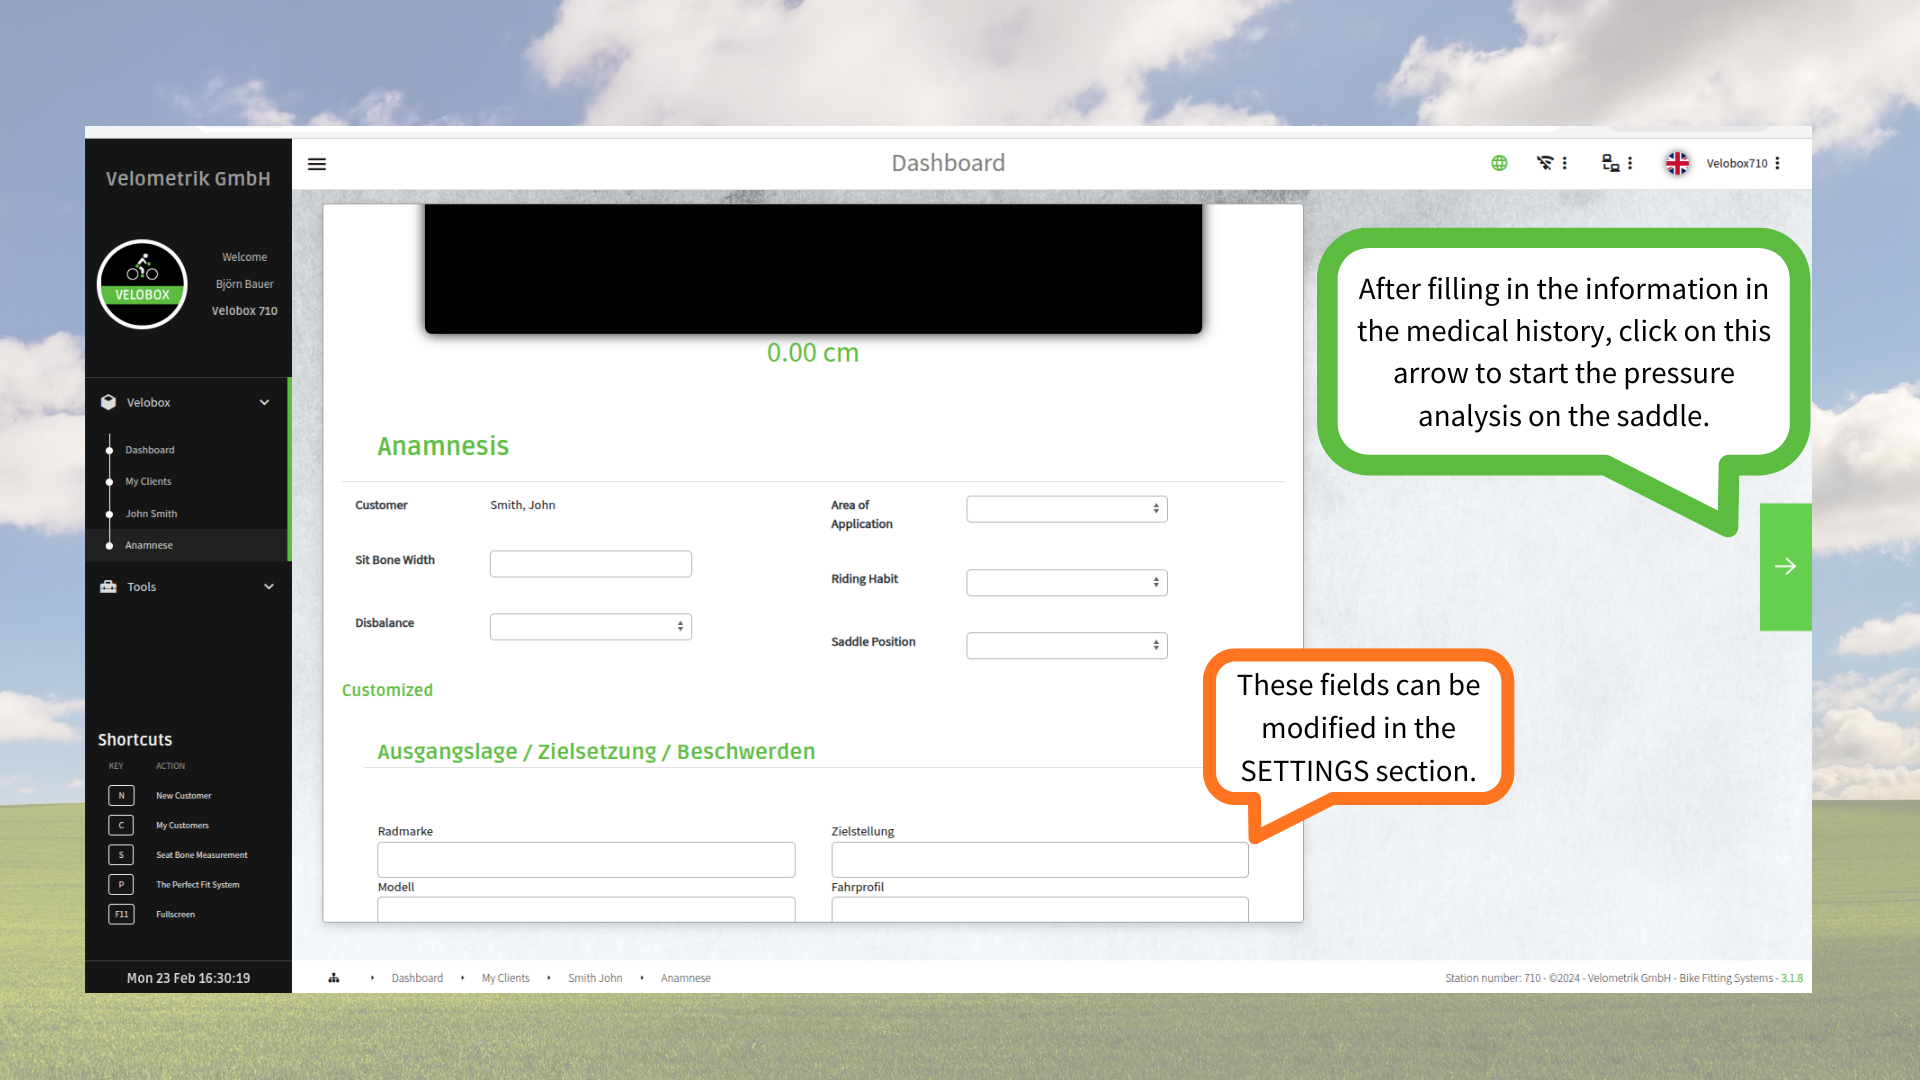
Img. 13: Client's Medical History.
5. If the connection with the SmartCover has not yet been established, the software will prompt you to connect to the SmartCover. Click “Connect.” The SmartCover connects automatically once the Velocontrol is detected.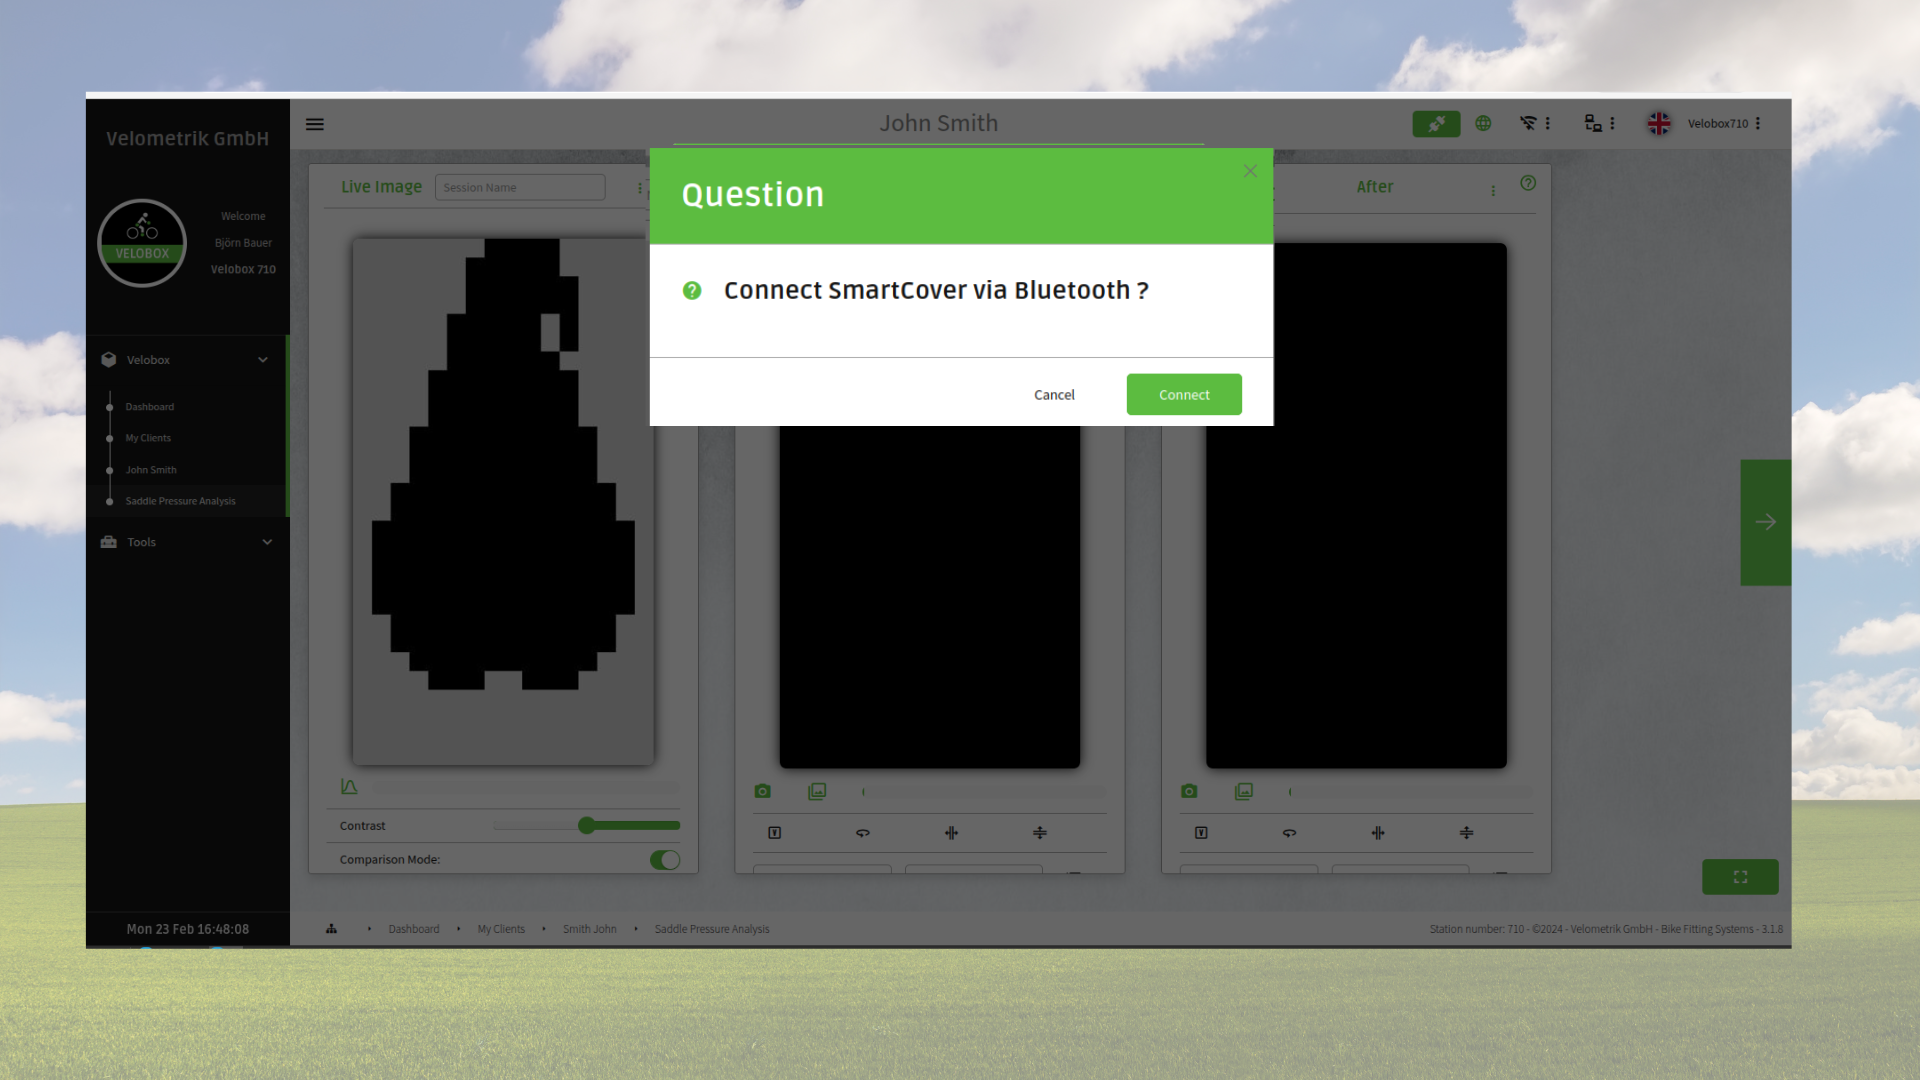
Img. 14: Connection Request.
6. Once connected, live data from the SmartCover is displayed in real time. You will be able to view areas of higher and lower pressure in graphical form. 7. When the LIVE image is visible on the screen, instruct the client to ride the bike for 1 to 3 minutes, depending on the objective of the session and the bike fitter’s assessment.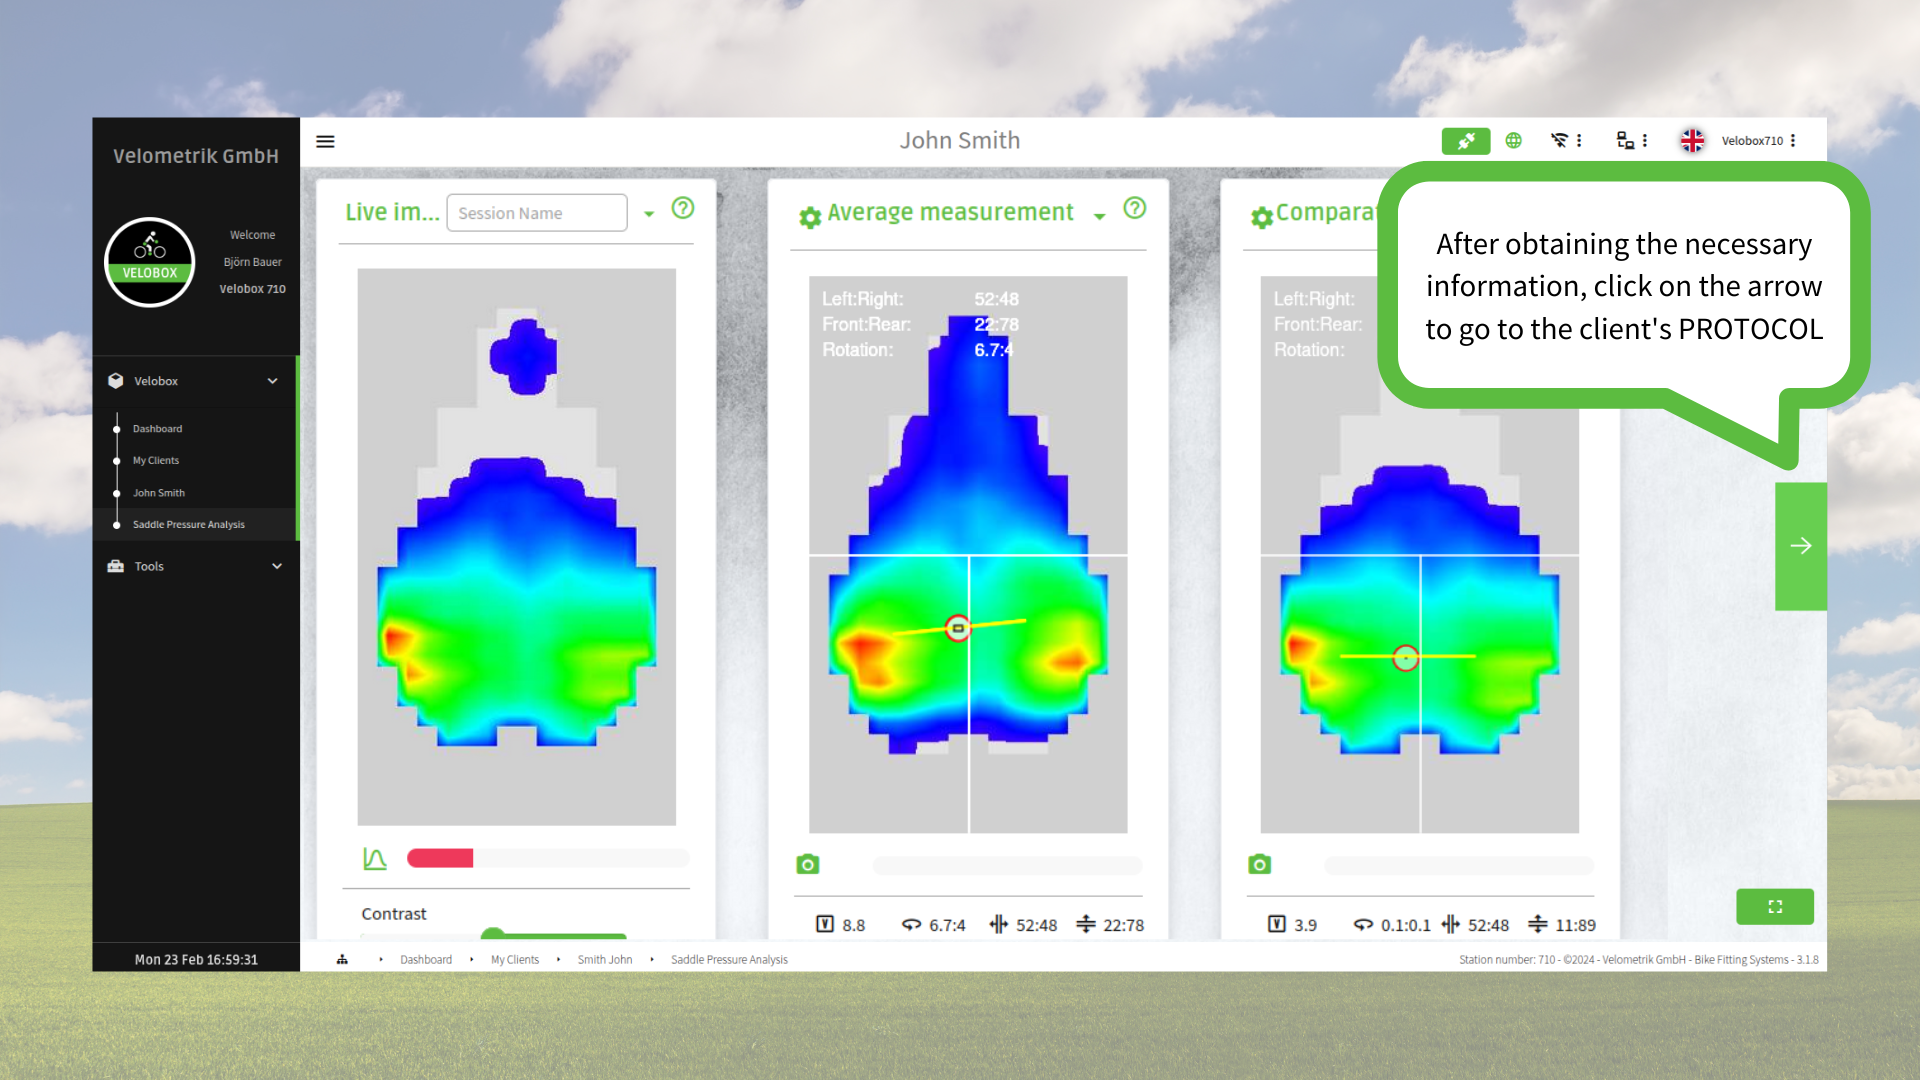
Img. 15: Saddle Pressure Analysis.
9. After collecting the required data, click the arrow icon to proceed to the client’s Protocol. Here, the session data is displayed and can be saved or exported as a PDF file for printing or sending to the client.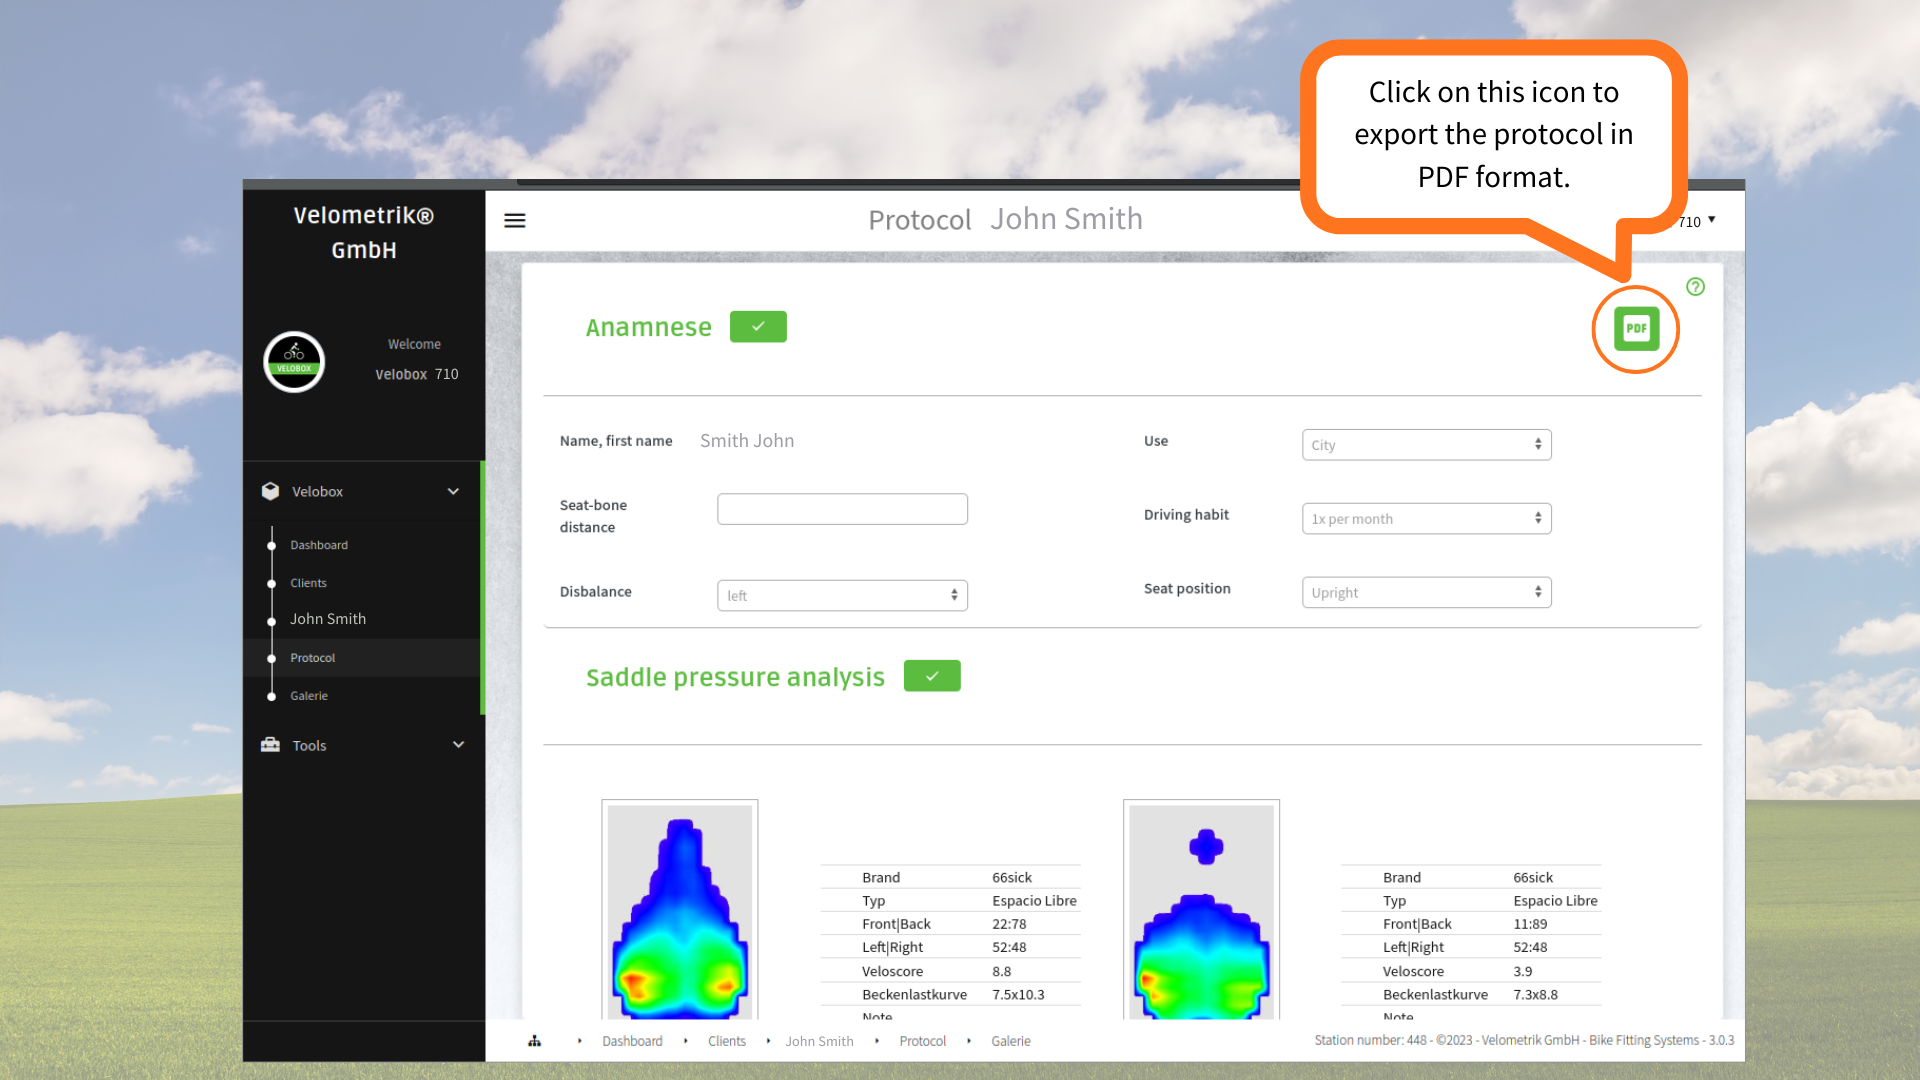
Img. 16: Client's Protocol.